Along with my thoughts on the process of hexmapping I want to chronicle the process by which I actually set up the Sandbox for my weird 1974 D&D campaign. For this I will be using my own tables, Welsh Piper’s hex templates, and a template that I’ve whipped up myself. I will be mapping with 30 mile world hexes, 6 mile regional hexes, and 1.2 mile local hexes because these match up the best to movement rates in my experience.
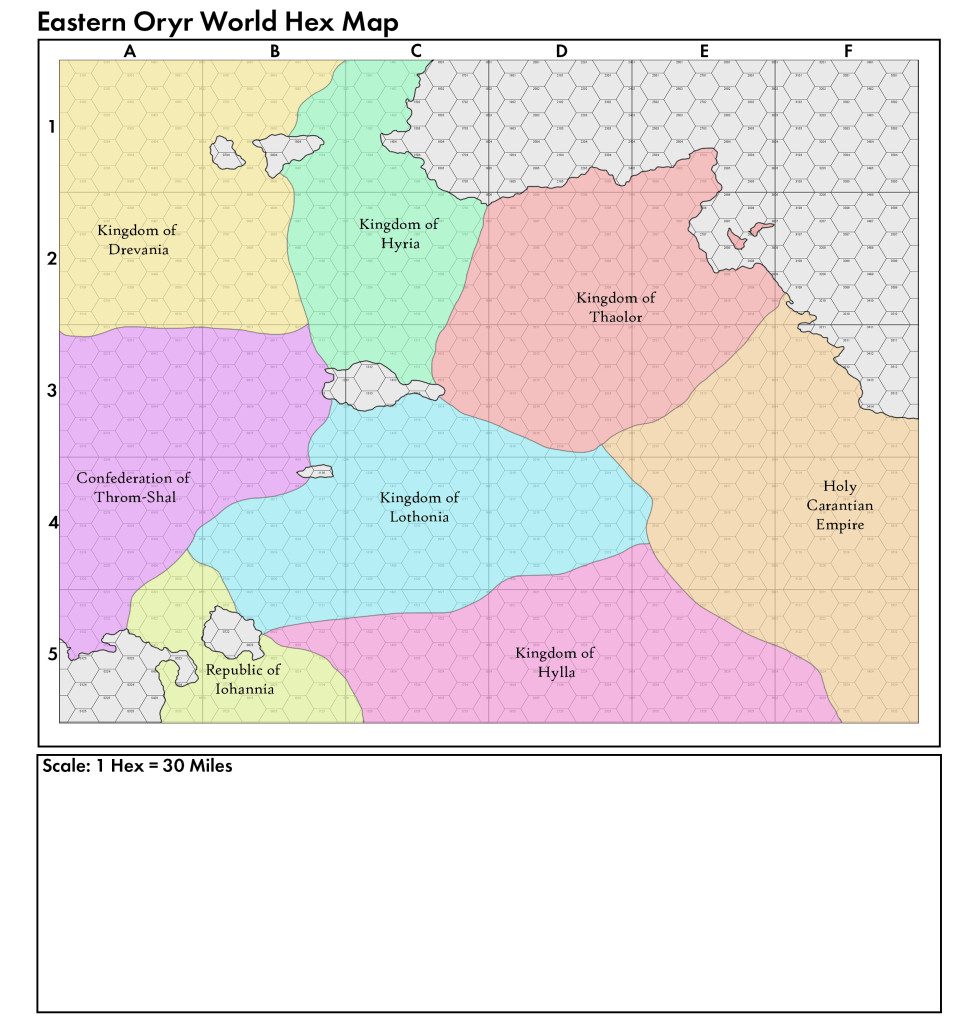
First, I used Azgaar’s World Generator until I got a continent of roughly the shape I wanted. Then, I opened the image I downloaded from the generator up into Photoshop and cropped it to fit into the hex area of the template that I created and will attach to this post. This produces a land area roughly the size of Central Europe. From there, I divided it up into countries based on what looked right off the map, this part is much more of an art form than a science.
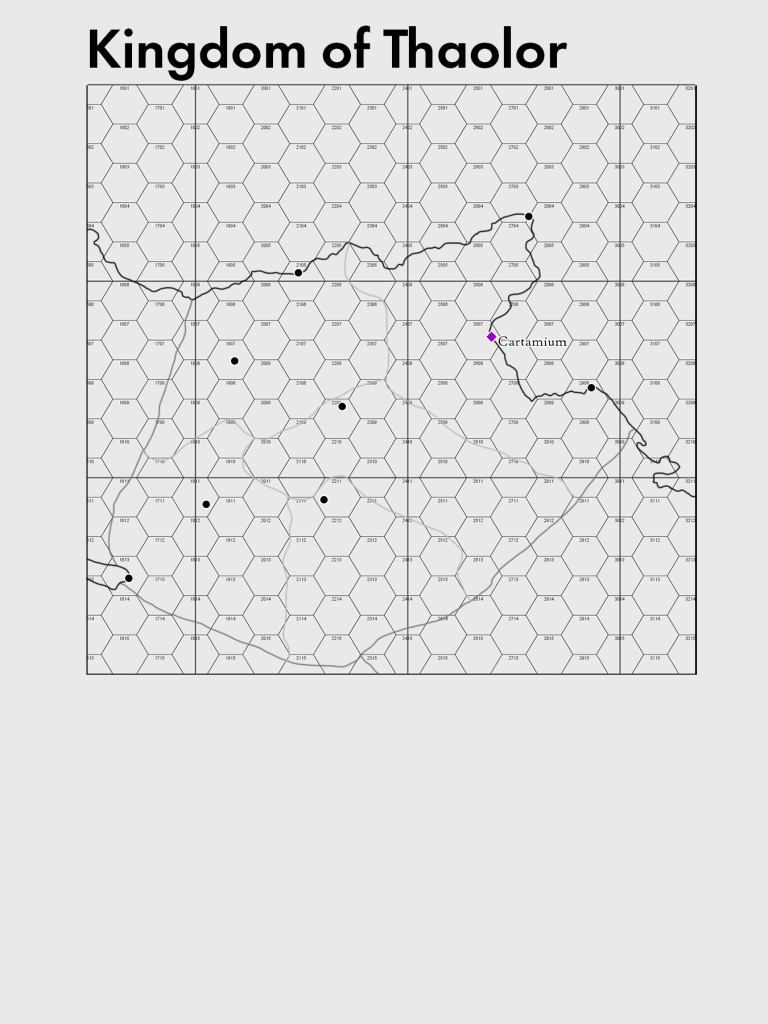
So after deciding upon the countries, their names, and their borders. I chose one nation to focus on first. As a result, this series will follow the development of the Kingdom of Thaolor. Once the focus of my efforts was decided upon, it was time to move onto the next step, which is cropping down the map to focus just on the Kingdom of Thaolor and determining its demographics. Since the vibe I was going for here was Late/Post-Roman Britain before the Anglo-Saxon migrations, so the population density of this kingdom is about 40 people per square mile.
With that information determined we were ready to go over to Welsh Piper’s Medieval Demographics Online to figure out how many cities we need to place. Plugging in our population density, a history spanning about 1,200 years of inhabitation, and the knowledge that Thaolor occupies about 85,800 square miles (a little bigger than modern day Austria) we learn that we have one massive city of about 17,000 people and eight smaller cities of about 10,000 people each. We can skip naming most of these cities now, we will come back to that but we can name the capital just as guide. The result is the below map which will serve as an excellent guide as we move forward.
Next we open up the sector template (use the hexRegional_5mileScale template from the Welsh Piper temaplates) in hexographer (this is the template we are using to drill down to a 6 mile per hex scale) and begin to fill in the terrain using the process described in my Thoughts on Hexmapping Part 1 post. I’m going to start with Sector E2. Once we finish that we can begin to stitch them together in Photoshop, which will be a time consuming but worthwhile process.
I won’t pontificate for too long on the placement of rivers. It is possibly one of the most discussed subjects in the whole topic of producing maps for fantasy roleplaying games. I will therefore remain concise. It is recommended that you place rivers in ways that make good sense and set them up to flow downhill into larger bodies of water. Lake hexes (bodies of water that take up at least one whole 6 mile hex should have at least two rivers leading into them but feel free to exercise your own judgement.
Step 3: Placing Settlements
Now almost just as much ink has been spilled in the tabletop blogosphere about cities and settlements. The system that I’m about to describe here isn’t necessarily breaking new ground but I am going to be synthesizing several ideas in this system. The main things that I’m drawing upon are Medieval Demographics Made Easy, Traveller’s Universal World Profile, Welsh Piper’s Cities & Settlements article and Medieval Demographics online tool, and this article by Bat in the Attic about using the UWP in a fantasy context.
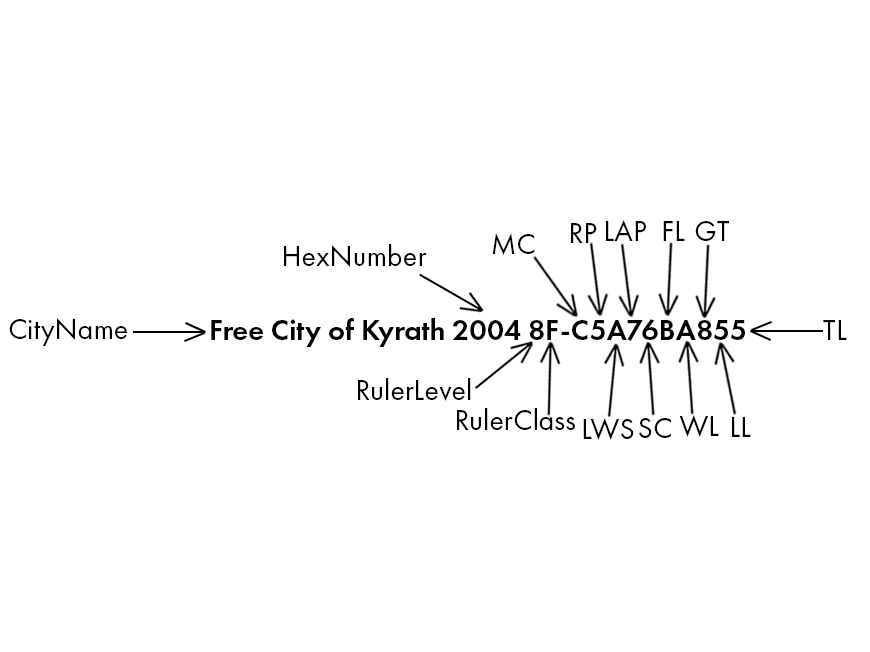
The Universal City Profile (UCP) The Universal City Profile, or UCP as I will call it from now on, is an alphanumeric code that is intended to portray a brush over of information on the hex map to make it into a more useful tool for running at the table. The UCP read as follows:
Resource Potential (RP) The Resource Potential score is determined by rolling 2d6-2 to produce a range of 0-10 (A). This represents how rich in non-agricultural resources the area the settlement is built on is.
Local Water Supply (LWS) The Local Water Supply score is determined by rolling 2d6-7 and adding or subtracting the appropriate modifiers to produce a range of 0-10 (A). Add +6 if the settlement is within 1 hex of a river. Add +4 if the settlement is within two hexes of a water hex. Add +2 if the settlement is in a forest hex. Subtract -1 if the settlement is in hill hex. Subtract -2 if the settlement is in a mountain hex. Subtract -6 if the settlement is in a desert hex. This value is automatically 10 if the settlement is in a swamp hex.
Local Agricultural Potential (LAP) The Local Agricultural Potential score is determined by rolling 2d6-7 and adding the Local Water Supply score to produce a range of 0-10 (A). This represents how fertile the farms and herds which are managed immediately outside the settlement and are used to feed the people of the settlement.
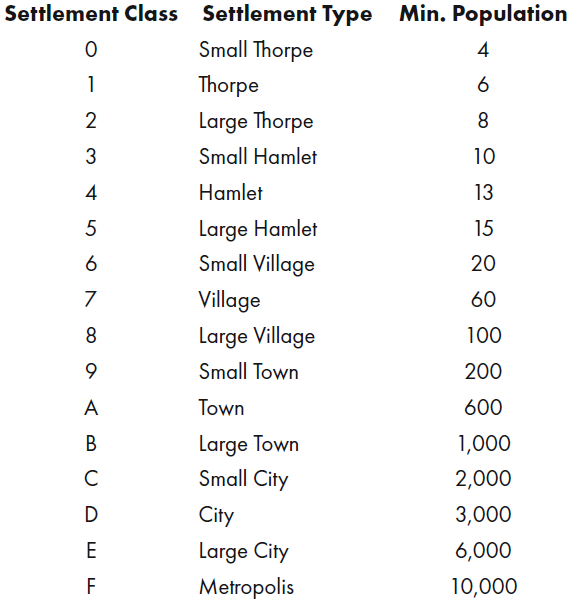
Population/Settlement Class (SC) The Settlement Class of a settlement is determined by rolling 2d6 and then adding the appropriate modifiers based on RP, LWS, and LAP, as well as its proximity to other settlements, as detailed below. This will produce a range of between 0 and 15 (F). The minimum population table is in units we will call families, which consists of 5 people.
If the settlement’s RP is 2 or less, subtract one. If the settlement’s LAP is 2 or less subtract one. If the settlement’s LAP is 3, 4, or 5, add one. If the settlement’s LAP is 6 or greater, add three. If the settlement’s LWS is 0, subtract two. If the settlement is adjacent to a settlement with a Settlement Class (SC) of C or higher, subtract six. If the settlement is within two hexes of a settlement with a SC of C or higher, subtract three. If the settlement is adjacent to a settlement with a SC of 9, A, or B, subtract four. If the settlement is within two hexes of a settlement with a SC of 9, A, or B, subtract two. If the settlement is adjacent to a settlement with a SC of 6, 7, or 8, subtract two. If the settlement is within two hexes of a settlement with a SC of 6, 7, or 8, subtract one.
Fortification Level (FL) This signifies what sort, if any, of fortifications (castles, keeps, etc.), that the ruler of the settlement lives in. This is determined by rolling 2d6 and adding the appropriate modifiers as detailed below.
If the SC of the settlement is C or higher, add six. If the SC of the settlement is 9, A, or B, add four. If the SC of the settlement is 6, 7, or 8, add two. If the SC of the settlement is 3, 4, or 5, subtract two. If the SC of the settlement is 2 or less subtract four.
A score of 12 or higher indicates a FL of A, which means that the settlement contains a full Castle (an internal Keep and surrounding curtain wall). A score of 11 indicates a FL of B, which means that the settlement contains a standalone Keep. A score of 10 indicates a FL of C, which means that the settlement contains a standalone stone Tower. A score of 9 indicates a FL of D, which means that the settlement contains a wooden Hall or Manor House. A score of 8 or less indicates a FL of X, which means that the settlement contains no such fortifications.
Wall Level (WL) This signifies what sort, if any, of wall or fence encircles and encloses the settlement. This is determined by rolling 2d6 and adding the appropriate modifiers as detailed below.
If the SC of the settlement is C or higher, add six. If the SC of the settlement is 9, A, or B, add four. If the SC of the settlement is 6, 7, or 8, add two. If the SC of the settlement is 3, 4, or 5, subtract two. If the SC of the settlement is 2 or less subtract four.
A score of 12 or higher indicates a WL of A, which means that the settlement has a high stone Curtain Wall. A score of 11 indicates a WL of B, which means that the settlement has a wooden Palisade. A score of 10 indicates a WL of C, which means that the settlement contains a low stone Fence. A score of 9 indicates a WL of D, which means that the settlement has a Hedge. A score of 8 or less indicates a WL of X, which means that the settlement has no such Wall or Fence.
Government Type (GT) This score indicates what sort of system of government that the settlement operates under. This is determined by rolling 2d6-7 and adding the settlement’s SC.
Government Type Table
Score
Type
0
Clan Patriarch/Matriarch
1
Council of Clan Elders
2
Aristocratic Oligarchy
3
Athenian Style Democracy
4
Temple Complex Rule
5
Aristocratic Republic
6
Feudal Noble
7
Colonial Charter
8
Bourgeois Republic
9
Centralized Bureaucratic Republic
10 (A)
Tyrant/Dictator
11 (B)
Petty King
12 (C)
Federation of Freemen’s Guilds
13 (D)
Theocratic Republic
14 (E)
Theocratic Dictatorship/Kingship
15 (F)
Inquisitorial Oligarchy
Law Level (LL) The Law Level (LL) of a settlement indicates how much the authority of the ruler interferes with the lives of its inhabitants, what sorts of weapons that PCs can carry in the settlement, and is used as a modifier on certain sorts of checks. It is determined by rolling 2d6-7 and adding the Government Type to produce a range of 0-10 (A).
A LL of between 0-3 means that PCs can carry any sorts of weapons openly in the street. A LL of 4-7 means that PCs can carry swords and daggers but cannot openly carry weapons of war (polearms, spears, hammers, etc). A Law Level of 8 or higher means that PCs may not lawfully carry any weapons other than daggers, which must not be carried openly.
Technology Level (TL) The Technology Level of a settlement indicates the level of technology that the settlement has access to and produces. For our purposes, this will always be 5, which indicates a level of technology consistent with the period between 1000 CE and 1300 CE.
As I’ve been working on Bloodfall and prepping for an old school sandbox campaign that I’m trying to start soon I have become increasingly troubled by the problem of hexmapping and enamored by the old Judges Guild Wilderlands products that I’ve had in my library for years now without much consideration. After a lot of time, consideration, and pursuing both Reddit and every OSR blog I could find, I have devised a very idiosyncratic and probably overly detailed system of creating a hexmap that serves my purposes. I was especially inspired by Welsh Piper’s Hex-based Campaign Design posts, Engine of Oracle’s Random Terrain Tables For Fantasy Hexcrawls, and Bat In The Attic’s How To Make A Fantasy Sandbox. Did the world really need another series of blogposts about hexmap generation? No, it probably doesn’t but alas here we are, for I am cursed with this affliction by the undying forces of Chaos! Hexcrawling and souls for my lord!
In this system hexes have three types: world (30 miles), regional (6 miles), and local (1.2 miles). This gives us world hexes with an area of roughly 780 square miles, regional hexes with an area of roughly 31 square miles, and local hexes with an area of roughly 1 square mile. Each world hex will consist of 19 whole and 12 half regional hexes, (the same goes for the number of local hexes a regional hex contains. If we wanted to go further we could break down the local hexes into an equal amount of roughly quarter mile “subhexes” with an area of roughly 14 hectares but I have seen no general reason to do this as of yet.
To start we will use Template A (found in the zipfile at the end of this post) which is 27 regional hexes wide and 19 regional hexes, giving us a regional area of about 15,903 square miles or a region just a little bit bigger than the country of Montenegro. First, if you wish to have any specific features like an idea for a coastline or a range of mountains place those in their respective areas of the map.
If you don’t have any specific ideas, pick a world hex to start in, I recommend somewhere near the center of the map. You can either choose or randomly determine the dominant elevation and dominant terrain of this starting world hex. If randomly determined the elevation of the starting world hex will be Lowland (1d6-1 times 100 feet, with negative values equaling zero) 60% of the time, Subalpine (1d10+5 times 100 feet) 30% of the time, and Alpine (1d8+1 times 1,000 feet) 10% of the time. Then use the following tables to determine the dominant terrain depending on the dominant elevation.
Lowland World Hex Terrain Table
1d8
Terrain
1
Desert
2
Farmland
3
Marsh/Swamp
4
Plains
5
Heath
6
Deciduous Forest
7
Water
8
Steppe
Subalpine World Hex Terrain Table
1d8
Terrain
1
Badlands
2
Desert
3
Deciduous Forest
4
Bare Hills
5
Forested Hills
6
Moors
7
Coniferous Forest
8
Fen/Bog
Alpine World Hex Terrain Table
1d8
Terrain
1
Bare Mountains
2
Desert
3
Deciduous Forest
4
Forested Mountains
5
Plains
6
Snowcapped Mountains
7
Peatland
8
Coniferous Forest
Now that you have a starting world hex, we need to populate the rest of the world hexes. For each world hex that shares a side with the starting world hex roll 1d100, 50% of the time it will have the same dominant terrain as the starting world hex, 25% of the time it will have a terrain which is considered “secondary” to the starting world hex’s dominant terrain, 17% of the time it will have a terrain that is considered “tertiary” to the starting world hex’s dominant terrain, and 8% of the time it will have a terrain which is considered “quaternary” to the starting world hex’s dominant terrain. Consult the tables below for these types for each dominant terrain.
Badlands (Subalpine) Terrain Types
Type
Terrain
Dominant
Badlands
Secondary
Desert (Subalpine)
Tertiary
Bare Hills
Quaternary
Heath (1-3) or Bare Mountains (4-6)
Bare Hills (Subalpine) Terrain Types
Type
Terrain
Dominant
Bare Hills
Secondary
Bare Mountains
Tertiary
Deciduous Forest (1-3) or Coniferous Forest (4-6)
Quaternary
Desert ( (1-3) or Marsh/Swamp (4-6)
Bare Mountains (Alpine) Terrain Types
Type
Terrain
Dominant
Bare Mountains
Secondary
Bare Hills
Tertiary
Forested Mountains
Quaternary
Desert
Coniferous Forest (Alpine) Terrain Types
Type
Terrain
Dominant
Coniferous Forest (Alpine)
Secondary
Coniferous Forest (Subalpine)
Tertiary
Deciduous Forest (Alpine)
Quaternary
Forested Hills (1-3) or Moors (4-6)
Coniferous Forest (Lowland) Terrain Types
Type
Terrain
Dominant
Coniferous Forest (Lowland)
Secondary
Forested Hills
Tertiary
Deciduous Forest (Lowland)
Quaternary
Marsh/Swamp (1-2), Water (3-5), or Farmland (6)
Coniferous Forest (Subalpine) Terrain Types
Type
Terrain
Dominant
Coniferous Forest (Subalpine)
Secondary
Coniferous Forest (Lowland)
Tertiary
Deciduous Forest (Subalpine)
Quaternary
Forested Hills (1-3) or Moors (4-6)
Deciduous Forest (Alpine) Terrain Types
Type
Terrain
Dominant
Deciduous Forest (Alpine)
Secondary
Deciduous Forest (Subalpine)
Tertiary
Coniferous Forest (Alpine)
Quaternary
Forested Hills (1-3) or Peatland (4-6)
Deciduous Forest (Lowland) Terrain Types
Type
Terrain
Dominant
Deciduous Forest (Lowland)
Secondary
Forested Hills
Tertiary
Coniferous Forest (Lowland)
Quaternary
Marsh/Swamp (1-2), Water (3-5), or Farmland (6)
Deciduous Forest (Subalpine) Terrain Types
Type
Terrain
Dominant
Deciduous Forest (Subalpine)
Secondary
Deciduous Forest (Lowland)
Tertiary
Coniferous Forest (Subalpine)
Quaternary
Forested Hills (1-3) or Moors (4-6)
Desert (Alpine) Terrain Types
Type
Terrain
Dominant
Desert (Alpine)
Secondary
Desert (Subalpine)
Tertiary
Bare Mountains
Quaternary
Bare Hills (1-3) or Farmland (4-6)
Desert (Subalpine) Terrain Types
Type
Terrain
Dominant
Desert (Subalpine)
Secondary
Desert (Lowland)
Tertiary
Bare Hills
Quaternary
Badlands (1-3) or Farmland (4-6)
Farmland (Lowland) Terrain Types
Type
Terrain
Dominant
Farmland
Secondary
Plains
Tertiary
Stepped
Quaternary
Deciduous Forest (1-3) or Coniferous Forest (4-6)
Fen/Bog (Subalpine) Terrain Types
Type
Terrain
Dominant
Fen/Bog
Secondary
Moors
Tertiary
Forested Hills
Quaternary
Heath (1-3) or Water (4-6)
Forested Hills (Subalpine) Terrain Types
Type
Terrain
Dominant
Forested Hills
Secondary
Forested Mountains
Tertiary
Moors
Quaternary
Fen/Bog (1-3) or Peatland (4-6)
Forested Mountains (Alpine) Terrain Types
Type
Terrain
Dominant
Forested Mountains
Secondary
Forested Hills
Tertiary
Bare Mountains
Quaternary
Fen/Bog (1-3) or Water (4-6)
Heath (Lowland) Terrain Types
Type
Terrain
Dominant
Heath
Secondary
Marsh/Swamp
Tertiary
Moors
Quaternary
Farmland (1-3) or Fen/Bog (4-6)
Marsh/Swamp (Lowland) Terrain Types
Type
Terrain
Dominant
Marsh/Swamp
Secondary
Moors
Tertiary
Heath
Quaternary
Farmland (1-3) or Fen/Bog (4-6)
Moors (Subalpine) Terrain Types
Type
Terrain
Dominant
Moors
Secondary
Forested Hills
Tertiary
Fen/Bog
Quaternary
Forested Mountains (1-3) or Heath (4-6)
Peatland (Alpine) Terrain Types
Type
Terrain
Dominant
Peatland
Secondary
Moors
Tertiary
Fen/Bog
Quaternary
Forested Hills (1-3) or Heath (4-6)
Snowcapped Mountains (Alpine) Terrain Types
Type
Terrain
Dominant
Snowcapped Mountains
Secondary
Bare Hills
Tertiary
Bare Mountains
Quaternary
Fen/Bog (1-3) or Water (4-6)
Steppe (Lowland) Terrain Types
Type
Terrain
Dominant
Steppe
Secondary
Plains
Tertiary
Deciduous Forest (Lowland)
Quaternary
Heath
Water (Lowland) Terrain Types
Type
Terrain
Dominant
Water
Secondary
Plains
Tertiary
Farmland
Quaternary
Heath (1-3) or Marsh/Swamp (4-6)
Desert (Lowland) Terrain Types
Type
Terrain
Dominant
Desert (Lowland)
Secondary
Bare Hills
Tertiary
Steppe
Quaternary
Water (1-3) or Farmland (4-6)
After all of the world hexes on the map are populated, it’s time to drill down and populate the regional hexes with elevations and terrain. Since there are 19 whole regional hexes per a world hex (and the center one already has its terrain populated we can then fill out the rest using the following tables (you can just fill out the hexes on the borders of each world hex with what makes the most sense).
