As I’ve been working on Bloodfall and prepping for an old school sandbox campaign that I’m trying to start soon I have become increasingly troubled by the problem of hexmapping and enamored by the old Judges Guild Wilderlands products that I’ve had in my library for years now without much consideration. After a lot of time, consideration, and pursuing both Reddit and every OSR blog I could find, I have devised a very idiosyncratic and probably overly detailed system of creating a hexmap that serves my purposes. I was especially inspired by Welsh Piper’s Hex-based Campaign Design posts, Engine of Oracle’s Random Terrain Tables For Fantasy Hexcrawls, and Bat In The Attic’s How To Make A Fantasy Sandbox. Did the world really need another series of blogposts about hexmap generation? No, it probably doesn’t but alas here we are, for I am cursed with this affliction by the undying forces of Chaos! Hexcrawling and souls for my lord!
In this system hexes have three types: world (30 miles), regional (6 miles), and local (1.2 miles). This gives us world hexes with an area of roughly 780 square miles, regional hexes with an area of roughly 31 square miles, and local hexes with an area of roughly 1 square mile. Each world hex will consist of 19 whole and 12 half regional hexes, (the same goes for the number of local hexes a regional hex contains. If we wanted to go further we could break down the local hexes into an equal amount of roughly quarter mile “subhexes” with an area of roughly 14 hectares but I have seen no general reason to do this as of yet.
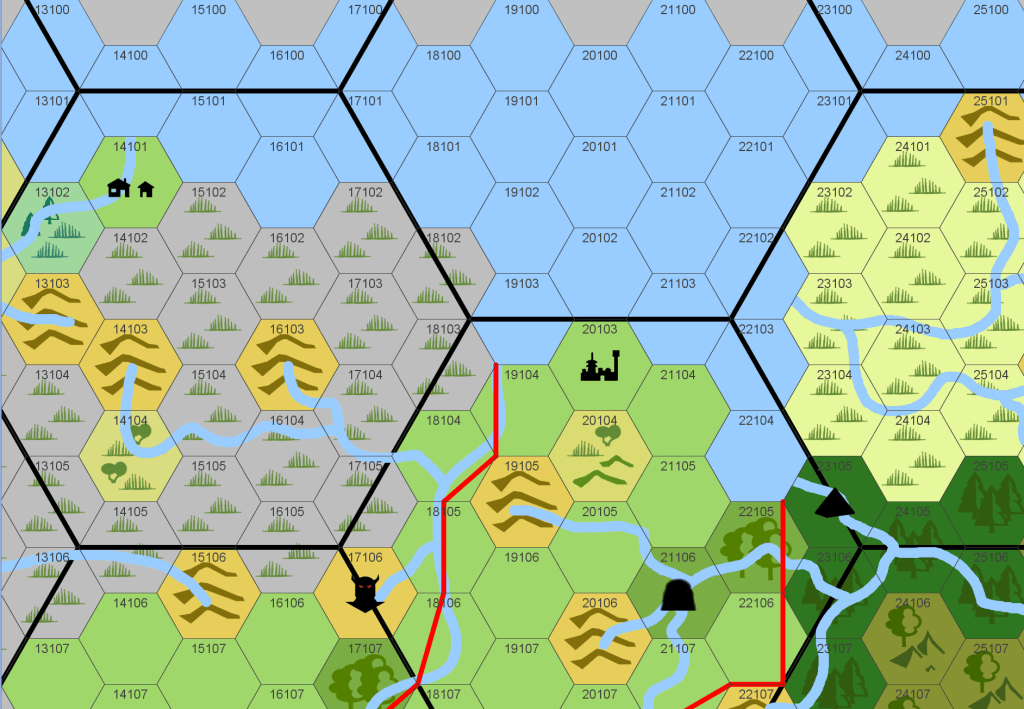
To start we will use Template A (found in the zipfile at the end of this post) which is 27 regional hexes wide and 19 regional hexes, giving us a regional area of about 15,903 square miles or a region just a little bit bigger than the country of Montenegro. First, if you wish to have any specific features like an idea for a coastline or a range of mountains place those in their respective areas of the map.
If you don’t have any specific ideas, pick a world hex to start in, I recommend somewhere near the center of the map. You can either choose or randomly determine the dominant elevation and dominant terrain of this starting world hex. If randomly determined the elevation of the starting world hex will be Lowland (1d6-1 times 100 feet, with negative values equaling zero) 60% of the time, Subalpine (1d10+5 times 100 feet) 30% of the time, and Alpine (1d8+1 times 1,000 feet) 10% of the time. Then use the following tables to determine the dominant terrain depending on the dominant elevation.
Lowland World Hex Terrain Table
1d8
Terrain
1
Desert
2
Farmland
3
Marsh/Swamp
4
Plains
5
Heath
6
Deciduous Forest
7
Water
8
Steppe
Subalpine World Hex Terrain Table
1d8
Terrain
1
Badlands
2
Desert
3
Deciduous Forest
4
Bare Hills
5
Forested Hills
6
Moors
7
Coniferous Forest
8
Fen/Bog
Alpine World Hex Terrain Table
1d8
Terrain
1
Bare Mountains
2
Desert
3
Deciduous Forest
4
Forested Mountains
5
Plains
6
Snowcapped Mountains
7
Peatland
8
Coniferous Forest
Now that you have a starting world hex, we need to populate the rest of the world hexes. For each world hex that shares a side with the starting world hex roll 1d100, 50% of the time it will have the same dominant terrain as the starting world hex, 25% of the time it will have a terrain which is considered “secondary” to the starting world hex’s dominant terrain, 17% of the time it will have a terrain that is considered “tertiary” to the starting world hex’s dominant terrain, and 8% of the time it will have a terrain which is considered “quaternary” to the starting world hex’s dominant terrain. Consult the tables below for these types for each dominant terrain.
Badlands (Subalpine) Terrain Types
Type
Terrain
Dominant
Badlands
Secondary
Desert (Subalpine)
Tertiary
Bare Hills
Quaternary
Heath (1-3) or Bare Mountains (4-6)
Bare Hills (Subalpine) Terrain Types
Type
Terrain
Dominant
Bare Hills
Secondary
Bare Mountains
Tertiary
Deciduous Forest (1-3) or Coniferous Forest (4-6)
Quaternary
Desert ( (1-3) or Marsh/Swamp (4-6)
Bare Mountains (Alpine) Terrain Types
Type
Terrain
Dominant
Bare Mountains
Secondary
Bare Hills
Tertiary
Forested Mountains
Quaternary
Desert
Coniferous Forest (Alpine) Terrain Types
Type
Terrain
Dominant
Coniferous Forest (Alpine)
Secondary
Coniferous Forest (Subalpine)
Tertiary
Deciduous Forest (Alpine)
Quaternary
Forested Hills (1-3) or Moors (4-6)
Coniferous Forest (Lowland) Terrain Types
Type
Terrain
Dominant
Coniferous Forest (Lowland)
Secondary
Forested Hills
Tertiary
Deciduous Forest (Lowland)
Quaternary
Marsh/Swamp (1-2), Water (3-5), or Farmland (6)
Coniferous Forest (Subalpine) Terrain Types
Type
Terrain
Dominant
Coniferous Forest (Subalpine)
Secondary
Coniferous Forest (Lowland)
Tertiary
Deciduous Forest (Subalpine)
Quaternary
Forested Hills (1-3) or Moors (4-6)
Deciduous Forest (Alpine) Terrain Types
Type
Terrain
Dominant
Deciduous Forest (Alpine)
Secondary
Deciduous Forest (Subalpine)
Tertiary
Coniferous Forest (Alpine)
Quaternary
Forested Hills (1-3) or Peatland (4-6)
Deciduous Forest (Lowland) Terrain Types
Type
Terrain
Dominant
Deciduous Forest (Lowland)
Secondary
Forested Hills
Tertiary
Coniferous Forest (Lowland)
Quaternary
Marsh/Swamp (1-2), Water (3-5), or Farmland (6)
Deciduous Forest (Subalpine) Terrain Types
Type
Terrain
Dominant
Deciduous Forest (Subalpine)
Secondary
Deciduous Forest (Lowland)
Tertiary
Coniferous Forest (Subalpine)
Quaternary
Forested Hills (1-3) or Moors (4-6)
Desert (Alpine) Terrain Types
Type
Terrain
Dominant
Desert (Alpine)
Secondary
Desert (Subalpine)
Tertiary
Bare Mountains
Quaternary
Bare Hills (1-3) or Farmland (4-6)
Desert (Subalpine) Terrain Types
Type
Terrain
Dominant
Desert (Subalpine)
Secondary
Desert (Lowland)
Tertiary
Bare Hills
Quaternary
Badlands (1-3) or Farmland (4-6)
Farmland (Lowland) Terrain Types
Type
Terrain
Dominant
Farmland
Secondary
Plains
Tertiary
Stepped
Quaternary
Deciduous Forest (1-3) or Coniferous Forest (4-6)
Fen/Bog (Subalpine) Terrain Types
Type
Terrain
Dominant
Fen/Bog
Secondary
Moors
Tertiary
Forested Hills
Quaternary
Heath (1-3) or Water (4-6)
Forested Hills (Subalpine) Terrain Types
Type
Terrain
Dominant
Forested Hills
Secondary
Forested Mountains
Tertiary
Moors
Quaternary
Fen/Bog (1-3) or Peatland (4-6)
Forested Mountains (Alpine) Terrain Types
Type
Terrain
Dominant
Forested Mountains
Secondary
Forested Hills
Tertiary
Bare Mountains
Quaternary
Fen/Bog (1-3) or Water (4-6)
Heath (Lowland) Terrain Types
Type
Terrain
Dominant
Heath
Secondary
Marsh/Swamp
Tertiary
Moors
Quaternary
Farmland (1-3) or Fen/Bog (4-6)
Marsh/Swamp (Lowland) Terrain Types
Type
Terrain
Dominant
Marsh/Swamp
Secondary
Moors
Tertiary
Heath
Quaternary
Farmland (1-3) or Fen/Bog (4-6)
Moors (Subalpine) Terrain Types
Type
Terrain
Dominant
Moors
Secondary
Forested Hills
Tertiary
Fen/Bog
Quaternary
Forested Mountains (1-3) or Heath (4-6)
Peatland (Alpine) Terrain Types
Type
Terrain
Dominant
Peatland
Secondary
Moors
Tertiary
Fen/Bog
Quaternary
Forested Hills (1-3) or Heath (4-6)
Snowcapped Mountains (Alpine) Terrain Types
Type
Terrain
Dominant
Snowcapped Mountains
Secondary
Bare Hills
Tertiary
Bare Mountains
Quaternary
Fen/Bog (1-3) or Water (4-6)
Steppe (Lowland) Terrain Types
Type
Terrain
Dominant
Steppe
Secondary
Plains
Tertiary
Deciduous Forest (Lowland)
Quaternary
Heath
Water (Lowland) Terrain Types
Type
Terrain
Dominant
Water
Secondary
Plains
Tertiary
Farmland
Quaternary
Heath (1-3) or Marsh/Swamp (4-6)
Desert (Lowland) Terrain Types
Type
Terrain
Dominant
Desert (Lowland)
Secondary
Bare Hills
Tertiary
Steppe
Quaternary
Water (1-3) or Farmland (4-6)
After all of the world hexes on the map are populated, it’s time to drill down and populate the regional hexes with elevations and terrain. Since there are 19 whole regional hexes per a world hex (and the center one already has its terrain populated we can then fill out the rest using the following tables (you can just fill out the hexes on the borders of each world hex with what makes the most sense).

Leave a comment